Most likely as a Scrum Master, you will be working with a team at some point that uses Jira. Jira being the most popular tool obviously shows that there is this necessity to know how it works, even if, obviously Scrum Master is not a Jira admin.
Why you should know how to use Jira
So if you are a Scrum Master, you should not be the sole person who owns Jira or who sets it up. But I think you do need to know how it works so that you can help your team and your Product Owner more specifically to organize everything you have there and keep it up to date, keep it actually useful.
You want to be able to use any tool, including Jira, of course, in such a way that it brings some important information to whoever is looking into it.
How Jira can help the team
As a Scrum Master working with a team, you want Jira to allow the team members to track their work and be in the know on what, where they’re at with progress, and what they need to do next.
The Product Owner needs to have a holistic view of the Product Backlog of the items that are to be created or worked on, but also be able to use it to forecast. So creating some forecasts, maybe planning some releases, and just organizing their work overall to have a better view of progress and be able to report on where the team is at with achieving their goals.
And then of course you can use Jira to create more visibility with stakeholders. Obviously, there are different ways how you can do that. There are Jira dashboards. There are many different apps that allow you to create many great things, but I’m not gonna be looking into that right now. What you can already do with whatever you have in Jira.
Pulling some of this data from there, or even just showing it as is maybe in the Sprint Review when you talk about the Product Backlog with your stakeholders.
Let’s jump into Jira and look at some of the most common tools and functionalities that you need to be familiar with if your team uses Jira to manage their work and their Product Backlog.
Main Jira window
Here I am on the main page, and yours might look a little bit different, but so far I think this is the latest view of Jira. As you can see, I have multiple projects here. Or multiple tabs basically related to different products or different teams. We’ll be creating a new one. There are different types of Jira software.
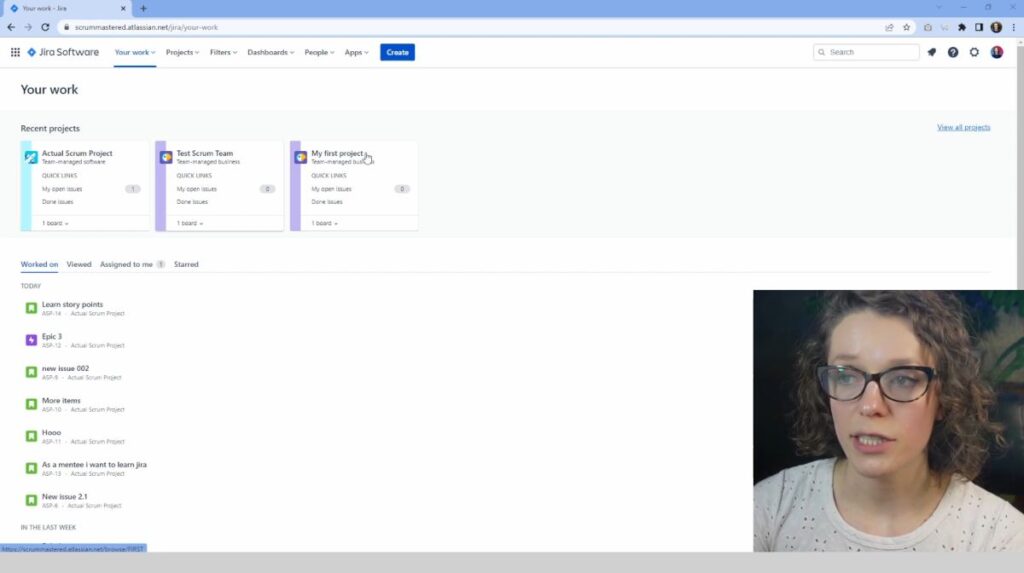
There is Jira work management. I am using Jira software. I think there is a difference between those two. Not sure what we have. Confluence, and I talked about Confluence in my previous video. We were creating Team Wiki pages.
We have all of these projects. As you can see, there are lots of items that I was kind of testing. Not as important right now, but what we want to do is to create a new project. So we’re creating a new project and we can choose.
So we’ll create a Scrum project because as a Scrum Master, most likely you are working with a team that is running sprints. It gives you the ability to create sprints, and then you can create epics, stories, bugs, tasks or subtasks.
The workflow is extremely simplistic as it just has three statuses: to do, in progress, done.
We’ll use team-managed for now, and we’ll give it a name. So let’s make our project realistic. I am going to use the plan and improvement plan that I have been working on. To help the team improve. This is not very specific to a team, so I’ll be gathering information from the different situations and other different projects I worked on.
Let’s put it, agile transformation. Usually, it’ll just take the first letters. Of the name, but you can also just change it. And I’m gonna call it agile because why not? You can create the project and here we go. So this is the agile board, and um, it drops us right away into the board view, which is the sprint view, but we’re not gonna be looking into that just yet.
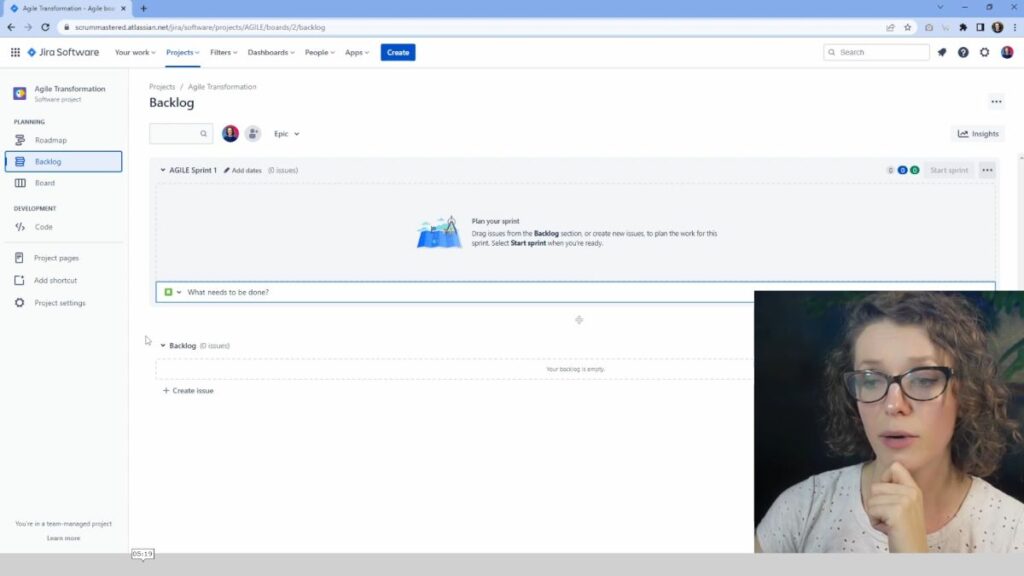
We’ll go into our backlog just to kind of see a general idea of what it is. We have our backlog here at the bottom. It’s empty, obviously. And then we have our sprint number one that hasn’t been started yet. As you can see, we cannot start it because it has no issues. And this is one way and one place where you can start creating items for your Product Backlog, right?
So you can click right here and start creating a story, a task, or a bug. But one thing that I generally recommend, is to start thinking on the epic level. So thinking about bigger tasks that you want your team to work on. And the way to organize it is by using epics. So you can see here it says Epic. If I click, obviously there are no epics, I haven’t created anything, but I can show the Epic panel right here.
Very new, nothing is there, and we can start creating epic. From this view, we can also start creating epics from the roadmap view. So if we create on the roadmap, we’re able to actually create epics and this little sign here, we can also create an epic or an issue by clicking on the create button at the top.
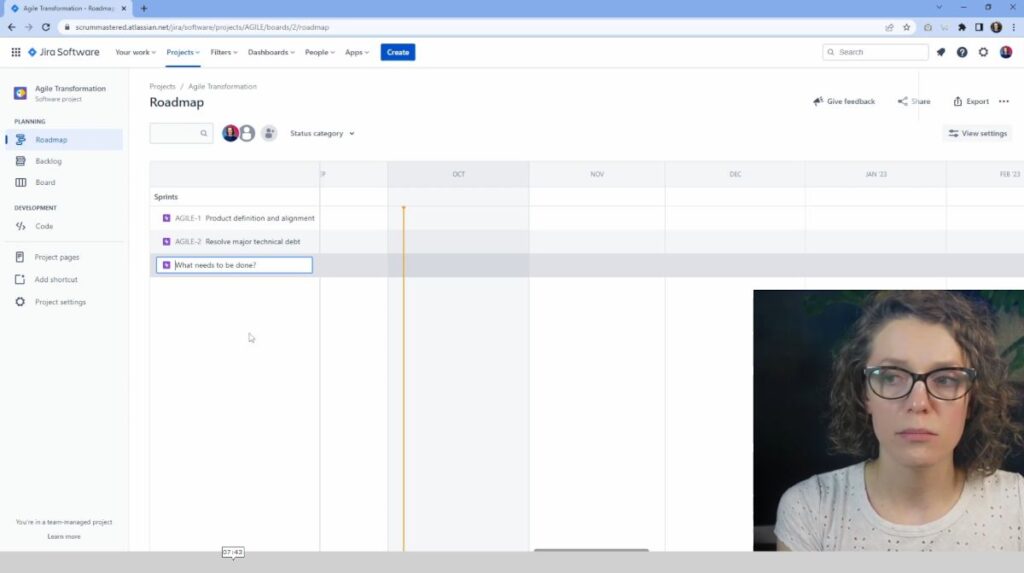
And we just need to make sure that we’re choosing the right project here, and then we can choose any issue type, which might be epic. So there are multiple ways of how you would go about it. So let me create a couple of epics, something that would make a bit of sense. So let’s say that in our agile assessment, we have identified that the product definition is not as well done.
So we’re going to say that our first epic is going to be, product definition and alignment.
By the way, if you want to know how to collect all of the data from your agile analysis or assessment into one beautiful presentation that you can show to your stakeholders, I do have a template that you can use.
Now let’s look into other things that we can add. Say product definition and alignment. This is pretty good. Maybe something around technical debt is a popular problem. Let’s call it resolving major technical debt.
This will be our epic number two, and maybe let’s create a third one. Maybe something around team building or team morale. Okay. And the third one will be in increasing morale and team spirit.
So these are the three epics that we have created. Obviously, they don’t have anything under them, they’re just epics.
So if we go into the Product Backlog, well, if we close the panel, we don’t have anything in the backlog because the only items that will be appearing in the backlog are the items that are small enough, basically the items that we will be taking into the sprints. So let’s open up our panel once again, and here we can see here are the three epics that I have created.
No dates, no issues, obviously. We can view the details for the epic in this panel here, and we can start adding a description, so maybe a product definition. Let’s look into some of the items that we can add. So we open up the epic on the right side. You can see this panel. We can start adding descriptions and acceptance criteria.
And obviously, start adding the items that will need to be done as part of this epic. If you have already watched my ZenHub tutorial, you’ll see that a lot of it is very similar to what I have done there. But let’s put some items here, for example, some of the findings that I had. So let’s maybe add some deliverables for now.
These will be our deliverables and obviously these items. We’ll be able to help us create the user stories, the tasks and everything else as part of this epic. So I’m going to save, and what I’m going to do is actually open it up. Jira likes to use a lot of the breadcrumbs. Basically all of this item, like links that show you the hierarchy of things.

Are you looking for more in-depth guidance on using Jira?
Learn the most essential features you must know as a Scrum team member in my online class Jira for Scrum Masters.
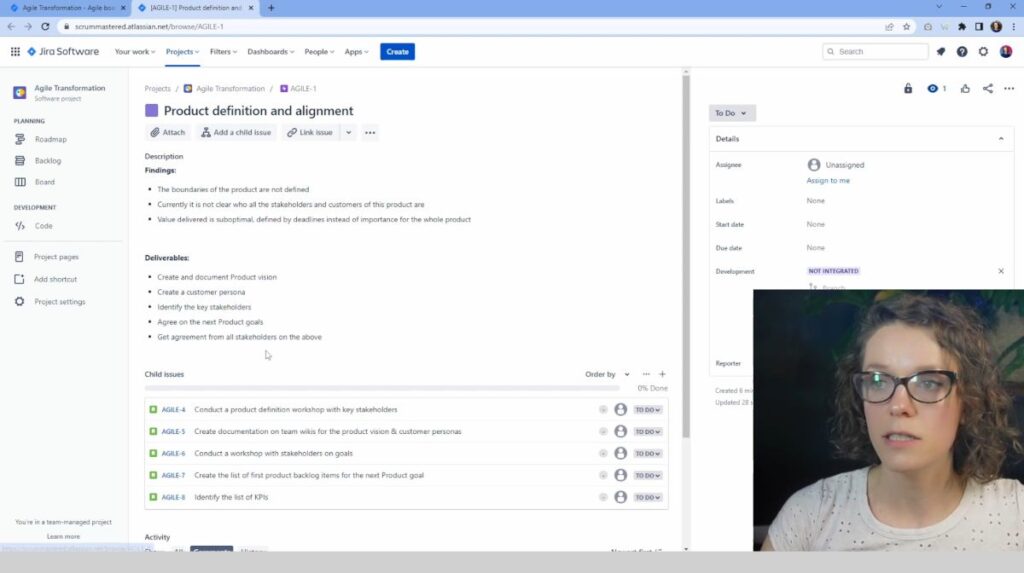
And sometimes it’s a bit confusing, but you can kind of get into every item, every ticket by clicking the link. So I’m going to open up the item for this epic “Agile transformation”. This is the epic we have just created, and obviously, we can have the conversations here, comments, et cetera, but let’s actually add child issues right here to be more specific about what we need to do.
I have created just a few things here. Kind of to, um, be more specific. So we will conduct a product definition workshop with stakeholders, and create documentation in our wikis. Then we have also a workshop talking about goals. More specifically, create a list of the product backlog items for the next big product goal.
And then, maybe also identify some of the KPIs. And now you have your, Epic and all of the items that are underneath the Epic. So now when we go back to the product backlog.
What do we see? Well, we have all of these items here in our product backlog now appearing. You can also immediately see what epic they are related to.
One of the things that can be very helpful if you have multiple epics, you don’t want all of them to have the same color. Obviously, you can read what’s written there, but what you can do if you actually go into the Epic when you click on the square here, so this vi violet square is right next to the name.
You can change color, and I find it very useful because that kind of gives you a visual view of everything you have on your product backlog without the need to necessarily read into each detail. So let’s refine. And as you can see now all of them are now blue. Maybe let’s look into the team morale.
We’ll view all details and we’ll maybe make it. Oh, so let’s think about the team morale. That’s a good epic to discuss. So what is the team morale? Maybe we’ll start with the findings.
So I added some findings just to have something on our list.
So we have “team is demotivated, doesn’t want to participate in meetings”. There have been no changes implemented and we have some people who left unexpectedly. So let’s think about deliverables. Okay, so I have created a few things here, just uh, as an example obviously, and let’s add some child issues to represent what are some of the tasks that we might want to.
Do Here, let me change actually the type, we’ll put it task instead of a user story just to have something different on our board. So let’s give these five, obviously that’s it. These are the items we’ll have. And now we can go back to our product backlog and look at that. Now our product backlog looks more and more live.
Lots of things happening. Now let’s go into resolve major technical debt. So I added a few things here into the findings as well as deliverables just to give us some ideas. So let’s start creating some of those tickets. This is just a few things that we can do, and going back to our product backlog.
Amazing. Our product backlog is looking nice. Now, let’s close this panel here just to have a bit more. Overview and view of what’s going on, and now obviously all of it is kind of aligned with the ethics. They all go one after the other. What we can do is start to reorganize it. Well, for example, we can do the product definition workshop and then we can do definition of done workshop.
That would be good to kind of happen around the same time. We sh won’t be waiting for the whole product definition to be ended before we would want to work on the definition of done. And maybe let’s run a team agreements workshop. That’s an important one that we definitely want to have here. So we have a few things right here.
We can reorganize, um, some other things in here. So this is how you would reorganize your product backlog. You can just drag and drop it very easily.
Let’s say we are starting, our sprint starts today and it’s going to run for two weeks – a very common sprint length.
Of course, you would want to have more description and potential estimations if you are using estimations. I’m not gonna be using it right now, and it means that we are ready to start our sprint. So we can click on the start sprint button. It is going to ask us a few things.
It is going to ask us for the dates as well as the sprint goal. This is not mandatory, but it is actually mandatory in Scrum. You can also, you know how to start the sprint to change those things. You can actually edit it and just click on this edit button and you can say, let’s say two weeks, it’s gonna automatically calculate it and then we, uh, might wanna want to create a spring goal, which would be, so I created this goal.
It’s pretty vague, but just to get us started, create baseline documentation for the product and team in the team weekly space. So we can kind of start updating now is ready. And let’s say this is the goal that I’m bringing into the sprint planning as a product owner. And now we’re thinking, well wait a minute.
We actually don’t have any weekly space whatsoever. So we have some other things that we need to discuss before we would be able to actually accomplish this goal. And that would be, uh, define what tools we’re going to use and create our first team page. Okay. So I have created these two to define what Wiki tools will use as a team and create the team overview page.
And obviously, these items have not been added to any specific Epic yet, so you don’t have any epic attached to them.
Not everything will have to be part of an epic, but what you can also do is actually, once again, open up the Epic panel and you can actually move things.
Starting a Sprint
Let’s actually start our sprint and here’s our first sprint. It started. So this is our Kanban board. This is where we can actually track progress. Obviously right now, everything sets to do because we haven’t started any work yet. We also have pretty simple structure here, so we have to do, in progress, done.
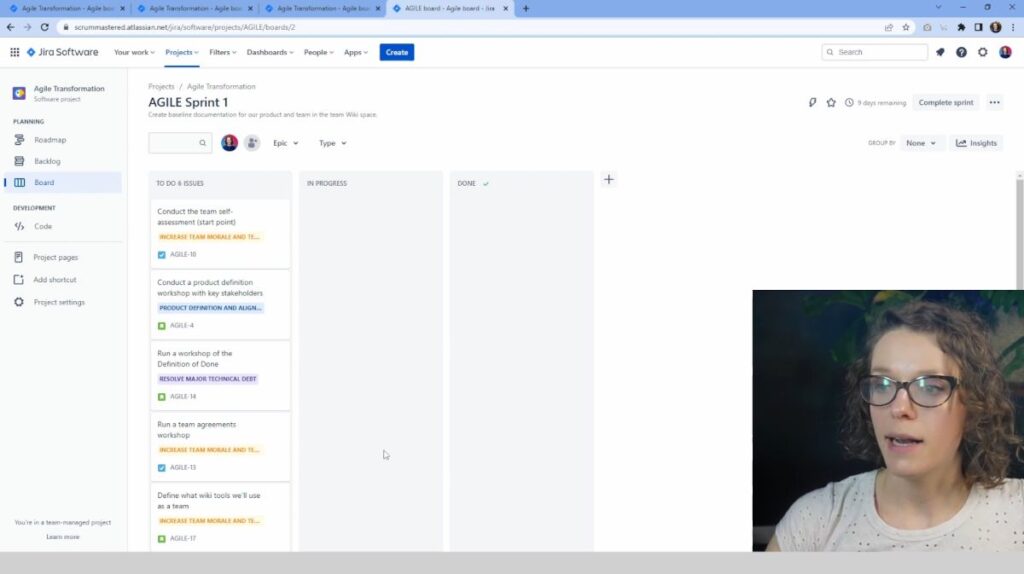
Maybe we want to add a couple of more. Let’s add another one maybe in review. So we’ll have to do in progress, in review and done, and obviously every item can start moving along. So let’s start with something simple. Create a team or review page and say, we can actually say, well, I have already created it, so it’s in review.
I send it to the team for review, and now we can maybe start with the assessment. When we have these items, obviously we can actually assign them to someone, and I’m gonna look into just a couple of things there to show you the important items and as we are in this item, So it opened up, just clicked here.
As you can see, it is not assigned to anyone. It means that we can assign it. Obviously I only have myself here, so I’m going to assign it to myself, and here we can see who it is assigned to. And it means that at the top we can easily filter, say I just want to filter by the person, me. So I click on my little icon and I can see it.
And then we can add people, obviously, or we can clear filters by clicking here or by clicking the same button so you can see the way your board looks. So whenever you come back, you can see an overall overview of what’s going on. And here at the top, you can see how many days are remaining. Now a lot of people, a lot of people have the blocked column here, and they would have it here.
Sometimes here, the thing is that it can get blocked at many different points. I really don’t like using that. I prefer to not have the blocked column for one very specific reason because Jira has a very good feature that is called “Add a flag”. And now this item is highlighted, so it’s red, right? It has a little flag and it is red here, very visual, and it also appears flagged here.
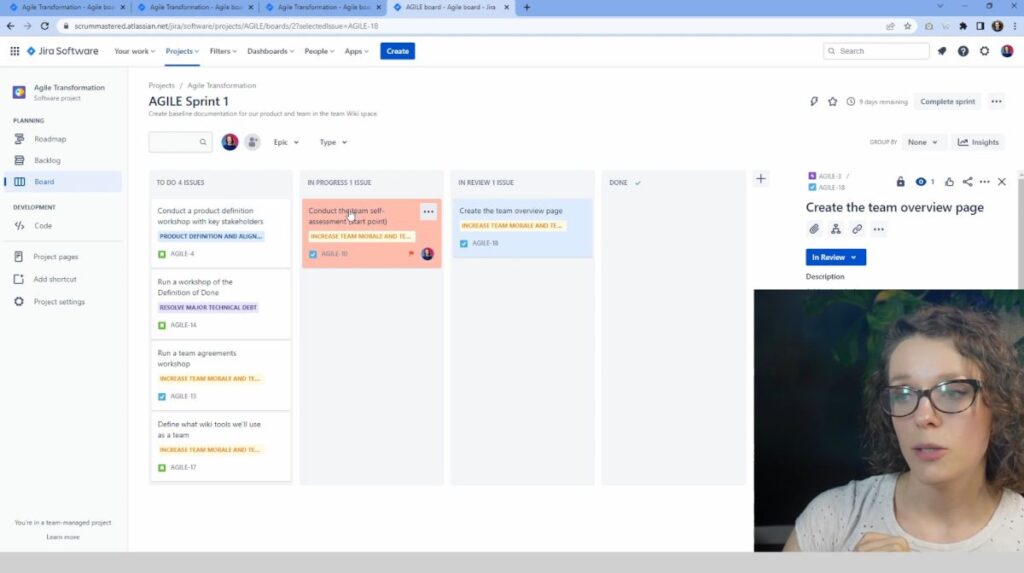
And that tells me, well this item is flagged, and it’s very easy to see it in the list right here. And I find it much more visual and easy to use than having a blocked column. The problem with the blocked column is that you would move items into the blocked column, but then you would need to move them back.
And that kind of creates a lot of confusion. At which point was it blocked? Was it while it was in review or in progress, or maybe before we even started working on it? So having a flag feature definitely is a great way to use it. So I definitely recommend using the flag feature rather than the board itself.
Completing the Sprint and planning the next one
And here, obviously, you have your sprint, and once the sprint comes to an end, you can complete it. Well, I still have nine days to go, so I’m not gonna complete the sprint.
Zero completed issues. Six open issues. Where do you want to move them?
Well, do I want to move in them back into the product backlog or do I want to move them to a new sprint that this system will create for us? Because we don’t have another one, we can also go back into the backlog and we can create our second sprint in advance.
Maybe start pre-planning during the backlog refinement. We’re already starting to decide what kind of issues we would like to add to the next sprint. Just a few points that can be helpful. If you are clicking on, say, an item here and you want to actually get to the Epic. If you click here, it only just asks you what other epic you want to change it to, but it does actually bring you to the Epic.
And if you click on this, here is the issue. And as I said, breadcrumbs, you can put, you can click on this issue.
Another cool feature is obviously we started this with the roadmap. And now we have the roadmap right here. We can open up and see what is the status of different issues. So we started working on a couple of items right here we can see in progress. And it obviously shows us the, the progress bar right here.
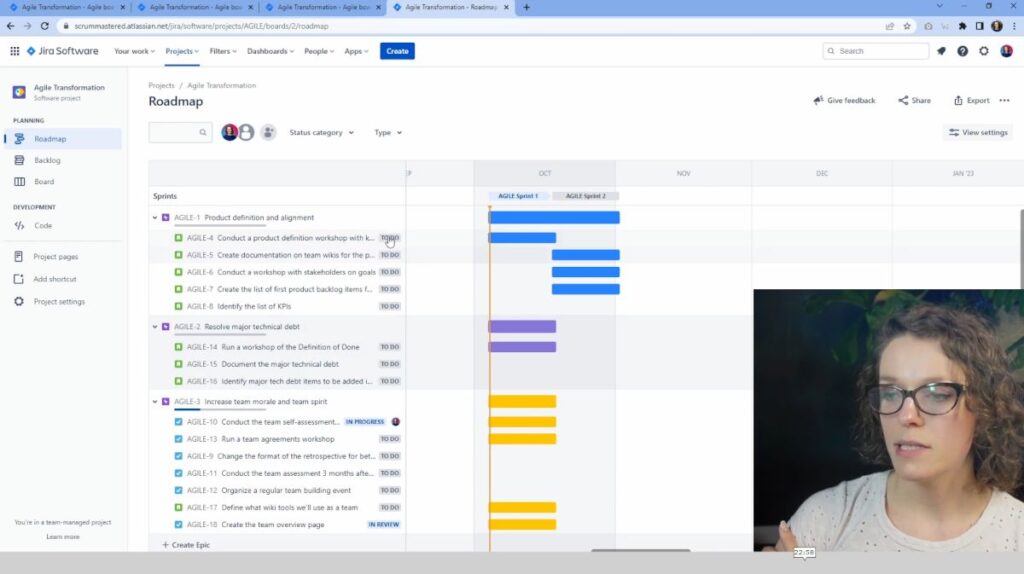
So when it is collapsed, it is pretty visual. This is one way of how you can organize. Your product backlog. There is also another feature that I really like using in Jira. It is the releases slash versions. As you can see, I don’t have it here, so we need to actually add them in the product set project settings.
Using releases / versions in Jira
So go in here, we have the sprints, we can add reports, and let’s add. Releases, we don’t need to have the code. So I’m gonna actually turn it off and now we have releases. That is another way of how you can organize it, and I would say that release can be used as a product goal, so kind of a bigger, higher level product goal, and it can be linked to a specific date or to maybe a specific set of functionality that you would like to deliver.
Or maybe a roadmap feature. So we can say something here. Maybe we can create a first few milestones and maybe we want to have kind of some improvements, seeing all of the key items at least started. For now, I will add, call it release 1.2, so we can put in the description that should be maybe a bit more detailed and we’re gonna say, well, we started today.
And maybe we want to finish right before Christmas. So I’m going to save it, and now we can see this release. And if we click on it, nothing is there. Here’s where we can go back to our backlog and start thinking about what items would go into which releases. And as you can see now we have the version tab in here.
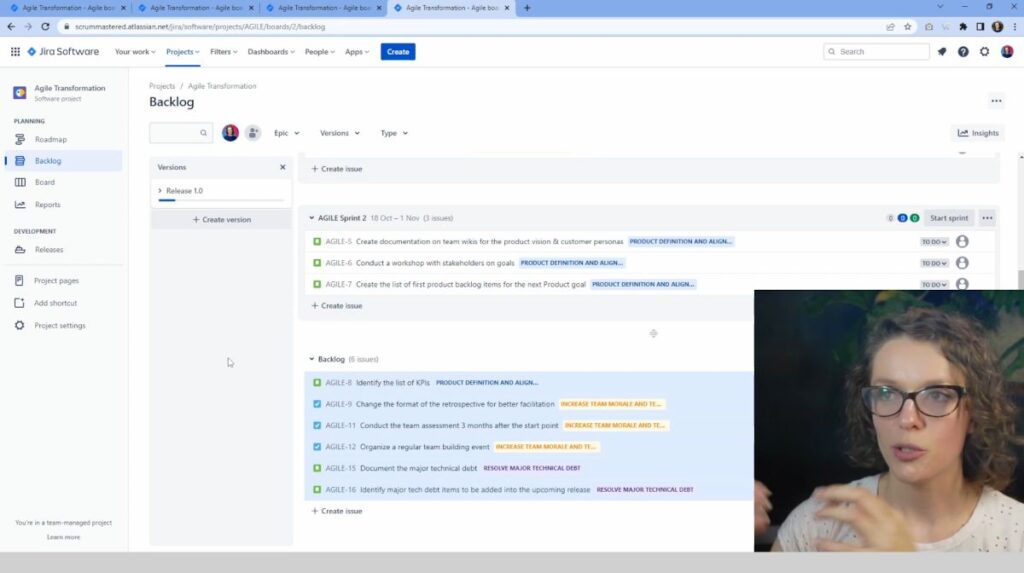
And we can open up the versions panel in the same way. We have different versions, the same as we had epics. We can in the same way. Now add all of it right here. Let’s say that everything we have right now on our product backlog is part of the release. Very easy. As you see, I have just selected everything and moved it into release one.
You would want to start with releases if you decided to use them because. Retroactively changing what release, like what item it belongs to, which release is a pain. I do not recommend it. And, um, maybe if you want to use releases, start from kind of from scratch planning for the next release. And if you have a very good product goal, you can use it as your release.
Milestone release objective and then plan for it more specifically. So in this case, we have our version or release. Both of them are the same. If we click on the item, it is going to be called a “fixed version”. Why it is called that way, I don’t know. But they are different, uh, ways of how it is called releases.
Versions really are, is talking about the same thing. So now when we go back to the releases, we can see the progress. Based on the progress that is made on the items that are part of this release. So if I click here, well, I can see all the items, I can see the status of all of the different items, how many issues are in progress, how many issues are done or in to do.
It is very, very helpful to see it that way, and I find it very helpful to organ to get organized from the get-go. And know exactly what you want to do for every goal, for every milestone. And here it also gives you how many days are left so you can really plan ahead and see if maybe we have only a few days left and most of it is in to do so, we might need to get back to the drawing board and plan again.
Do we need to adjust the timeline? Do we need to adjust the features that we’ll be able to deliver?
Well, we need to have a discussion around that, and these reports can be very helpful. You can obviously add the release notes here and you can use the information from Jira for those release notes.
Obviously it’ll depend on how well you are creating your product backlog issues, but you can also create your own release notes. And then once you click release, when the release is done, we’ll show as a green one in the list. Right now it’s blue because it is still unreleased, and in the same way you can create multiple releases and start planning ahead.
When we go back to the roadmap, we also start seeing a release, so this can be very helpful. As you can see, we have a sprints line that shows us very different sprints that we already have. And then we have releases showing us the date. Also, very helpful because we can have a visual overview of what is going on, where we are at, are we progressing?
This will be all of the things. How that you can use to help you team plan, and use the tools that are at your disposal. Make it easy. It is not as hard as it seems, really. You are using your product backlog to create items to plan ahead. And then you use the board here, the Kanban Board to help you understand where you are at in regards to your sprint goal.
Conclusion
These are all of the key functionality that I wanted to show you in this video, so really focusing more on organizing the broader backlog and organizing the sprint backlog. And how you can use Jira. It is pretty straightforward. I don’t think that it has such a big learning curve as it have been before.
I think they really optimize their ui. Right now it looks a bit cleaner. It is still a little, a little bit confusing, I’d say, but you can, as you can see, there are some certain features that are pretty easy to use. And can be a great help for your product owner when forecasting, when planning ahead and organizing the product backlog as well as to your team to give them more visibility into the goals that are set by the product organization, by the stakeholders.
The product owner, whoever makes those decisions, and it can be very easily shown in a visual way and used to actually present then this information back to your stakeholders. Maybe pulling up the roadmap in your sprint review can be a great way to actually have the conversation around the overall progress towards your milestones.
I hope you learned something new, and if you did like subscribe and comment down below what other features or functionality you’d like me to look at in Jira or Confluence or maybe what other tools you’d like me to investigate and show you how to use in your work, and I’ll see you in the next video.
