Let’s learn a new tool today!
In this video, I’d like to go over Figma, just another collaboration tool that can help you really bring your teams together in a remote setting and run great workshops. So it is very similar to Miro and Mural. So the tools that I have already covered, but it offers some different functionality and features that you can use.
It is kind of an open source where developers can add new plugins and widgets into it and obviously, there are already lots of things from their community that you can use and there are a few features that I really like. So let me jump into it and see what it has to offer.
What is Figma?
Figma originally started more as a design tool that can help you create wireframes and designs for your websites, your applications, and all these things. So to kind of show you, give you a visual representation of everything that you want to build. The second tool that they have is called FigJam and this is really that kind of collaboration tool that helps you build collaborative environments online.
And so this is what we will be looking into more specifically. Because obviously the design just has a bit of a different audience and a different purpose. Real quick on pricing. They do have a free plan where you can have three Figma boards and three FigJam boards. You can kind of use already a lot of their functionality to make it work for your meetings, for your workshops.
But of course they have paid plans as well. So if you would like to check out Figma for free, I do have a referral link in the description. So go and check it out and you can actually follow along with me. So here I am in my dashboard in Figma. As you can see, lots of things that are happening in here already.
I think I was trying out some tools. And as you can see, if I kind of hover over different boards, they will have different. Types of little editing icons right here, right? And that basically highlights which files are which the blue ones are the design files The original Figma files, right? And then the purple ones are the think jump boards So what I did, I have already created a little blameless postmortem, just a little file for us to go over and explore.
Retrospective MEGA Bundle
This bundle contains all of the retrospective guides available in the store in one. Buy the bundle once, and get new updates forever! Any new retrospective technique guides created in the future will automatically become available to you.
You’re saving 25% when buying in a bundle.
Blameless post-mortem template
First things first, just a few things that we definitely need to know from the start when we’re looking into Figma is, of course, different tips and tools and how to navigate the board. So you can basically move around and zoom, apparently, you can hold… space bar and use the hand tool to pan around zoom controls or at the top, right off the corner.
Right. But I like to actually just press control on my keyboard. And when I’m holding it and then I’m using my mouse wheel, I can zoom in, zoom out. It’s just a faster way to move around. And then when I want to move the same, I am just pressing the middle button on my mouse. And I can move around as well by just kind of holding and dragging.
You also have at the bottom, this is your, really the toolbox, the main toolbox you will be using, which has the select tool, which I have right now, or I can select. So if I’m just clicking, left click and drag, I can select multiple elements. Or I can use the hand tool. In this case, it basically just… It allows me to move around the board without selecting anything.
I generally use the select tool overall. So as you can see, they have some helpful tools in here and we will see how to use them. So you have the marker, obviously. So this basically allows you to draw. You can choose different types of markers. You can also have washi tape, which I kind of find pretty fun, to be honest, because you can actually just, you know, make your board a little bit.
More fun. So that’s kind of why it is there. Then you have the eraser and Yeah, so you can use those tools. Then you have different shapes. So here there is an ellipse That is a circle that is selected, but you can change to different shapes and I am using these shapes later in my Workshop and then you can change the color as well.
And of course the sticky notes, right? So you can just select different colors Select a sticky note. If I’m clicking here and then I’m clicking here, it creates a sticky note. So pretty straightforward and you can also press S on your keyboard and it’s going to do the same. So the overall controls are pretty similar to all of the other tools that we have. You have text, connectors.

We’ll talk about stamps and we’ll talk about this button as well a bit later. But first things first. You have sections. So this is the tool that I definitely recommend using to everyone, whether you’re in Miro or if you’re using it here, to separate your content into sections because it will be easier to navigate.
So I have just kind of created this section by using the section tool. I can change the color of the section and I can give this section a name. So that is how I did. and organized, kind of went in and organized all of my content. So let’s look into what I have for this workshop. So it’s just a blameless postmortem, similar to a retrospective, really.
What I did as I’m reading this book, a new video about this book coming out, by the way, soon. In this book, they are talking about blameless post-mortems to do after incidents. And so I thought that is a great way to use what I learned in this book. and also use it with FigJam. I start off with some introductions.
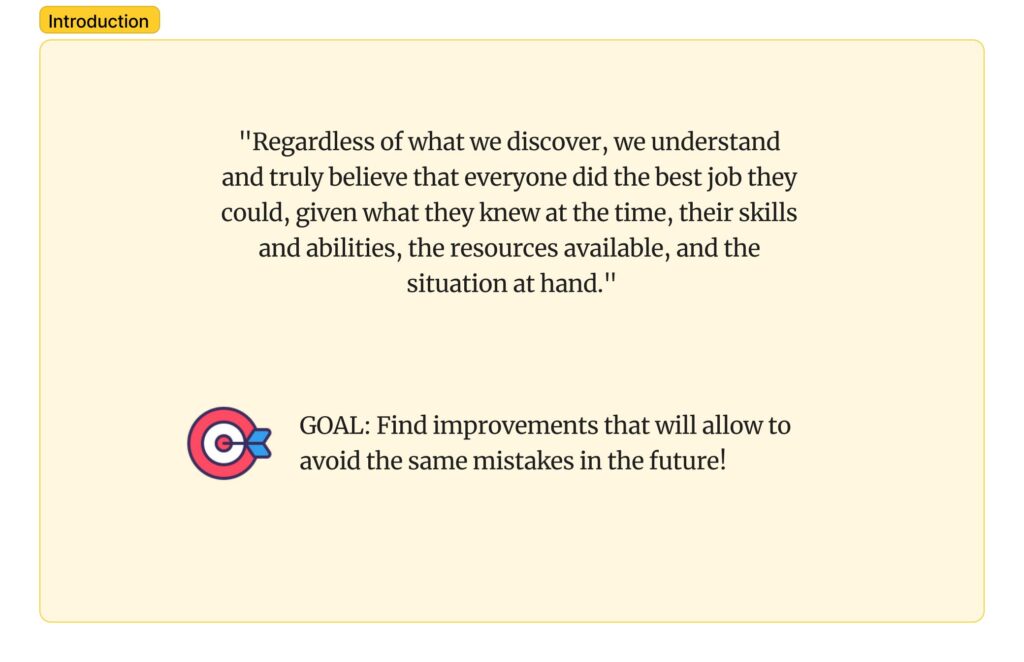
As usual, my retrospective prime directive. Very important because the whole point of this is blameless postmortem. As you can see at the top right there is where the name of my board is. I put in a goal for what we’re trying to do in here. I put in a little image in here. Now we can move to the next part.
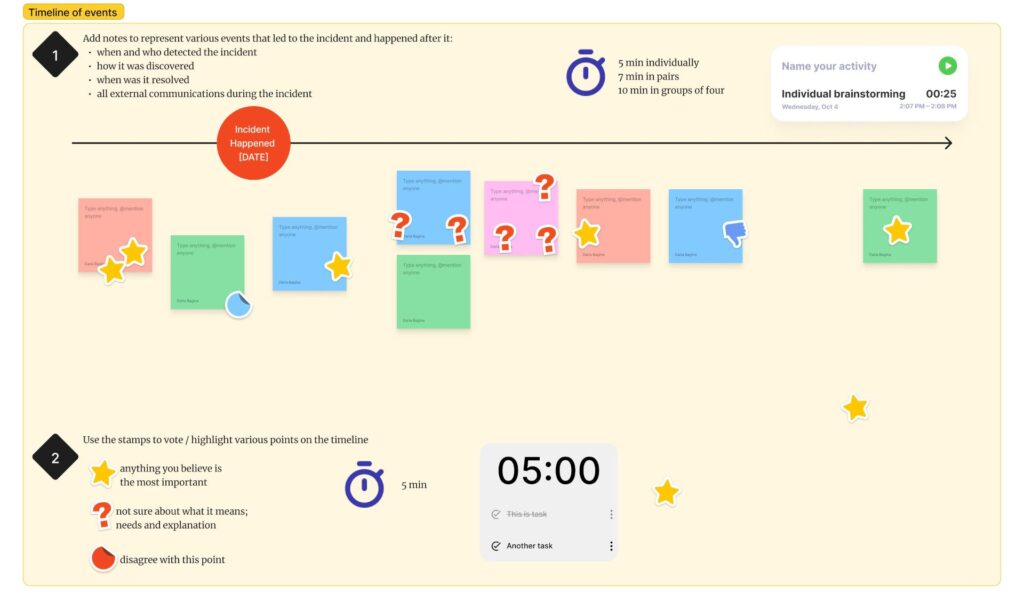
And so here is where I started to create more different activities. So in a blameless postmortem, first, we want to identify what happened, right? So I have created just a little line in here using the connector. Just use the basically just the connector right there.
And then I put in a little shape. So I just put in a shape in red right here. Put in some text in it. And there, this is kind of our timeline. And then here I’m using a different shape to present different steps of our workshop. Here I’m talking about, hey, add Notes to represent various events that led to the incident and happened after it and then I show a little timer kind of explaining Okay, here’s how much time I’m going to spend in different Groups whether individually in pairs or in groups.
Widgets in FigJam
As you can see I have this little thing here Name your activity which is called activity tracker.
So what is that? And that is one of those cool features that you have within FigJam that you don’t have anywhere else is this button here at the bottom where you can click more and then you have a lot of different things obviously stickers templates more specifically widgets and plugins So I am here using a widget And I’m using this widget activity tracker.
I just wanted to show this to you, whether you’re using it with your team or not. So if you don’t want to maybe use a timer, you want to have more of an open conversation or just an open timer. Let’s put it that way. You can actually start a timer right here. You can say individual brainstorming. And so you click and the timer starts.
So you can kind of start the timer, just give people a bit more of an open time for it. Maybe that can be a way for you to track time the team spends on different reviews or things like that. And then once the activity is… And then you will click just stop or you can pause it obviously and then it gives you okay Here’s how much time has been spent on individual brainstorming This is the date and the time right that can be pretty useful if you’re tracking some of that work Maybe teamwork coming together some team building exercises or whatnot.
But of course, you can use a timer. So in the top left corner, you have this timer, so you can put in any timer. You can start it. Uh, there are some different sounds, right? You can close it. The timer will be right here, kind of counting down. And then of course, you can stop it. But this timer is kind of at the top.
It’s not as visible. So as you can see, I added another widget right here, which is also coming from this widget space. And I was just looking for a timer. They have two Pomodoro timers. So they’re limited in terms of how much time they actually give you. But, uh, it’s actually just a little timer that is visible right here.
And once you start it, there it goes. You know, so this is just a widget that you can do. You can have even tasks in here. This is a task. Maybe you’re given a timer and you want to make sure that people will feel all of the tasks they have So you can actually put in a few tasks in here another task That can be a pretty cool thing If you’re maybe sending people into a longer exercise for example And you just want to make sure they remember what they need to do and then they have a timer They have this little tasks at the bottom and they can check them out I will as in check not yet check them out in the way Uh, but just kind of, uh, put a checkbox when they are actually finished.
And what you can also do, you can actually copy it. So I just copied the timer, so just started with this timer and I can refresh it and start it again. So that really just kind of changes, just shows it to you right here. And I really like the possibilities that it can give you right here. And as you can see, you can do like different lengths.
As I said, it’s a bit limited in terms of the time that it gives you. So in the same way, as you can see, I have created different sticky notes. Okay. Let’s add one more sticky note. And it’s too big, let me make it a little bit smaller. And the cool thing is that it actually gives you the name of the person or who was editing the sticky note.
So let’s say we are, now we have completed this number one item in here. So we have all of these sticky notes and now we want to do some voting. And in this. second part in here, I actually say, Hey, use the stamps to vote or highlight various points on the timeline. I’m giving a five-minute timer again, right?
The best feature in FigJam!
So what are stamps? And this is exactly this little button at the bottom here stamps. You can also pull up this menu by pressing E on your keyboard. And so in here what you see are all of these different stamps that any person can use. And I said, hey, use different stamps to highlight the items on in here.
We’re giving you the participants the time to look into that, right? And so for example, let’s say, oh, I want to really put in a little stamp to on this one. I actually want to put in even two on this one and this one and this one. So I just use the stamp. So I still have it. Kind of floating, I can put it anywhere I want.
I can once again press E on my keyboard and say, uh, Actually didn’t understand what this one means, right? And so I can put in little stamps in here to show questions, right? Or maybe I disagree with something So I just use a different stamp. And of course you can define what kind of stamps you So you can actually add more stickers, I believe, that you can just add in from here, right?
So maybe you want to just put in a little stamp in somewhere here, just a little sticker. But stamps… This feature is really, really nice, and I find it really great to help you give people different ways to kind of share their ideas or their emotions, their votes, using these stamps in a super easy way.
Right, we don’t have a voting session, we just say use the stamps and here is the timer. And so let’s say we have finished doing all of that, we have discussed it using the stamps and now we want to pass on to the next step, well what is it? Well, this is creating a list of different factors that contributed to the incident and we want to focus on those because this is where we’ll know what to do to be able to avoid this incident in the future.
And so the same, I have steps three and four and five, right? And so if we just add a few things in here, right? So we have a few things. People have added onto our board and now I can do a voting session. Now you have a native voting session in here where you can start a new vote, but this is a paid feature.
So I do have a free plan, but if you want, obviously you can have that voting feature, but if you don’t want to upgrade or you’re not ready yet, you can use different widgets. to help you. So here on this right side, I have simple vote and this is just a widget. So if we go down there, um, and this more button and then we click on widgets and then we can start show me widgets that are talking about voting.
And sometimes you need to click around a little bit because it takes a second to load. And as you can see, There are so many different things that you have. You have another widget for voting sessions. You have an alignment scale that you can use for specific questions. You have even a poll where you can have different, uh, Questions for people right here in the app, right?
You can just add it in here. There is another poll-related question. So maybe let’s add this. I’ll just, you know, click on it. And now I have this widget floating in here. It means that I can customize it, and set the prompt. This tool is great. Right, and then I can add options. We agree. It’s okay
And so you put it in here and now everyone who comes to the board can actually vote on it, right? Obviously I’m the only person in here So you can only see this one vote if we are were to kind of have another person then we would see all of these Answers in here. So this can be pretty good if you’re running something like a team self-assessment.
There is a guide for that!
If you’d like to run a self-assessment with your team using tools like FigJam’s poll widget, then this Team Self-Assessment guide is perfect for you.
You can prepare a lot of these polls in advance And allow people to vote on them and that will give you immediately the results in a nice presentable format, but here as you can see I have selected this simple vote, and once you kind of figure out how to use that you can easily set it up say well I’m gonna do the votes anonymous and secrets until vote shown Maybe not actually allow multiple votes and let’s say three votes per person And now I just select these items and I can click start.
It said, okay Well, we’re selecting out of these five items. I have three votes So I can distribute those votes in here and obviously, once other people have started voting, we would see more numbers and we can, in the end, Um, and actually see what is the overall vote. Uh, as you could see, I would be able to actually just do, I can show like secret votes until shown so that people do not create bias with each other by kind of seeing how, who voted on what, or just seeing how many votes each card had.
So just a quick widget that you can use. You don’t have to use this. And the same, you can just set the timer and use this. And then the last one that I wanted to show you here, obviously, we have defined all of the factors that have contributed and now let’s actually say, what are we going to do? And a few things that I think are pretty cool.
We can define different actions. So I can say, create a presentation for your content for your stakeholders. And maybe let’s organize a sprint review. So, for example, these are the three things that we have identified that we want to do. Those are our action items. And as you can see in here, it says, Hey, use your individual stamp to volunteer to drive the actions.
I can use this little stamp with my little image. And say, I’m going to take on this one and this one. And people can kind of use the stamps to continue to volunteer. And then you can discuss and say who is going to do what.
FigJam + Jira
As you may have noticed already in here, you have the JIRA widget, which means I can select all of these and say, hey, turn these stickies into issues.
And so when I click this, obviously, you will need to have admin rights to connect the two software tools, really. I already did, and I can say, hey, please convert them, right? So it pops up, and I can now select the project I want to add it to, and the issue type. And say, cool, great, we have decided, convert it into those issues.
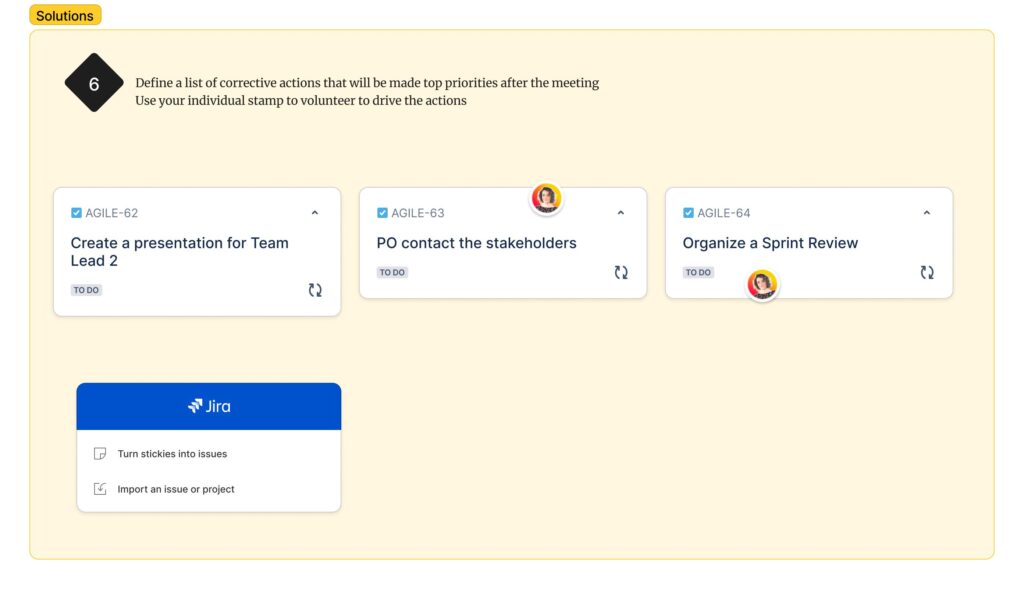
And what’s going to happen, as you can see, it has just created them. And they appear a bit differently. They give me exactly the number of that issue. And if I make changes in here, I can refresh it, and it will be synced back into Jira. And the same if we make changes in Jira, it’s going to be synced back in here.
So this is absolutely great. I really love this feature. if you are using something like that, because then you can immediately have actionable items in your backlog and you can plan for them. So this is really cool, especially if you are using the FigJam board for, say, user story prototyping or user story mapping.
You are maybe creating a roadmap. All of these things you can actually You can put in all of your information from your backlog and do it here, right? That can be pretty nice to actually be able to connect the two and not have to recreate them manually. As you can see, this widget also has import an issue or project in the same way.
It’s not the first time that I get this little hand appearing. I’m not sure what it is, but it’s got to mean something. So obviously if I can zoom out. See everything that is here. I can add templates, right? So if say I Decided to use something from here. They have many different templates. So I obviously didn’t look into all of them They have some weird ones as well, but they have some retrospectives, right?
Team meeting agenda that can be useful and many different things. I believe they have use a journey map, right? And so we can say, Hey, please add this template in here. What it does it at the end. Thank you for that. It’s like not covering everything I already have. I think this is pretty nice. I believe.
Miro doesn’t do that, but there you go. You have this template. You can go in and start Using it as is right to create your user journey map and they already kind of give you some of those Ways of how you can use this template and of course you can create your own. I really enjoy having The widgets, I really think it’s great.
I enjoy different, the widgets like that you can even connect to other tools. You can have stamps, pretty cool feature, like I’m not going to lie, I absolutely love it. And then if you go into this and you go into the widgets to see, okay, what else is there? There are lots of different things, right? You have some fun things like you have the warmups from Donut, which I believe originally was something like an integration with Slack.
Then you have different graphs, you have timeline, like one thing that I think I saw, I wish we had this in Miro or Mural, is the, I think it’s the calendar. So I really enjoy this calendar one. Look, so this is a widget, right? So it means that it already has everything predefined It has been developed by someone like it shows me what day it is today I can obviously put in the stamps as usual I can put in the sticky notes Where I want.
I guess these people who have created something for user experience and UI have a different way of looking at it. Obviously, will it be exactly the same? Will it provide you all the same features? Probably not, but it’s as always right there isn’t one perfect tool. It’s really about figuring out which tool you prefer A few sharing I think options in here is that when you’re sharing Once you have created a board it’s going to be in draft and then you need to add it into your project Now the only I think big problem with figma is that you either have to Send it to someone if you’re on a free plan send it to someone with an email or you You probably will need to upgrade.
So you can have like an open session as they call it, where you basically can send out a link and anyone who has a link to your board will be able to join, but you need to actually to upgrade to be able to do that. But if not, you can just invite them by email. I’ve been invited into multiple different FigJam boards or Figma boards previously was just my email.
So you just need to log into the account in order to be able to use it. So pretty cool little thing in here. As I mentioned, if you would like to try Figma and FigJam for free, I have a referral link right there in the description under the video. Go ahead and check it out, uh, see what tools you really love and maybe find, start creating a board for yourself that you can use in the upcoming workshop, just to try it out with your team.
That really just… Summarize everything that I wanted to show you. Once again, another cool tool that you can use. If you are interested in learning other tools similar to that, then check out my videos on mural and mural that can give you great similar collaboration tools for your remote teams, and I’ll see you in the next video.
